Introduction
Silicone adhesive is commonly used in bathrooms, especially in showers. It seals joints and prevents water damage, protecting surfaces from moisture. However, there comes a time when you need to remove old or damaged silicone adhesive from your shower walls. Whether you are renovating your bathroom or simply maintaining it, learning how to remove silicone adhesive from shower wall is essential.
Removing silicone can prove challenging due to its sticky nature and strong bond. This guide will provide you with the necessary knowledge and techniques to effectively remove silicone adhesive. You will discover various methods, tools, and safety precautions to take during the removal process. It’s time to tackle the task with confidence and ensure your bathroom looks pristine.
Understanding Silicone Adhesive
Before diving into the removal process, it’s crucial to understand silicone adhesive itself. Silicone is a versatile, flexible material with excellent sealing properties. It is waterproof, heat-resistant, and adheres well to various surfaces, including tiles, glass, and plastic. These properties make silicone adhesive an excellent choice for bathrooms.
However, its strong adhesion can be its downfall. When it comes time to remove it, many people find they struggle with residues that cling stubbornly to the surface. Silicone makes cleaning somewhat tedious, which is why it is essential to know the correct methods to use. Understanding what silicone adhesive is and why it behaves the way it does will help you appreciate the removal process.
Necessary Tools and Materials
To successfully learn how to remove silicone adhesive from shower wall, you need the right tools and materials. Having the proper equipment will make the process more efficient and less frustrating. Here’s a list of essential items you will need:
1. Scraper or Razor Blade
Use a plastic scraper or a razor blade to gently lift and scrape the silicone adhesive off the wall. A plastic scraper is less likely to damage the tile or wall, while a razor blade can be more effective for stubborn spots.
2. Silicone Remover or Solvent
Silicone removers are specifically designed to break down silicone and help you remove it more easily. Alternatively, you can use solvents such as mineral spirits or rubbing alcohol, which can also aid in loosening the adhesive.
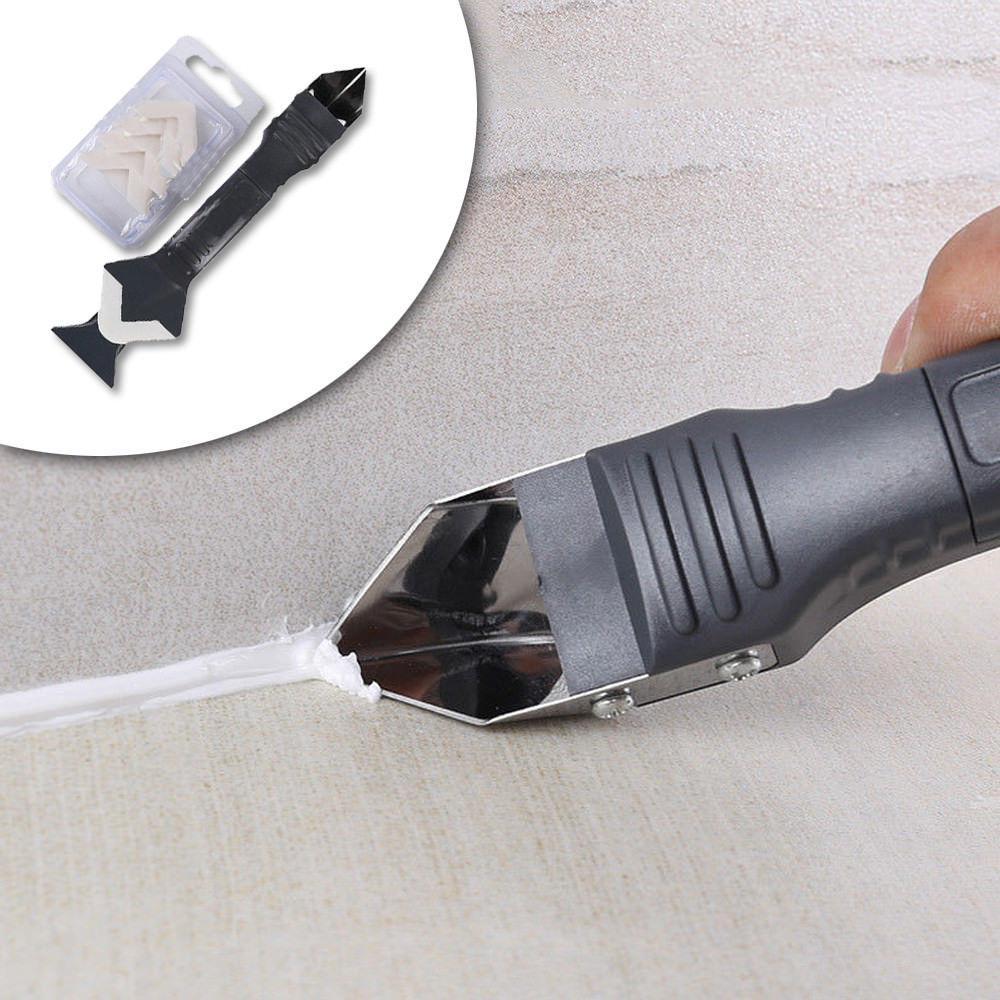
3. Caulk Removal Tool
Many home improvement stores sell specialized caulk removal tools. These tools feature blades and edges that can make removal easier, especially around corners and tight spaces.
4. Protective Gear
Always wear safety goggles and gloves during the removal process. Silicone removers can be harsh, and it’s essential to protect your eyes and skin.
5. Clean Cloths or Paper Towels
Keep clean cloths or paper towels nearby to wipe away any residual adhesive or solvent as you work through the removal process.
6. Bucket of Warm, Soapy Water
A bucket of warm, soapy water can be used to clean the area after removing the adhesive. This helps ensure any remaining solvent or residue is fully washed away.
Transitioning to the Removal Process
Now that you have all the necessary tools and materials at hand, you’re prepared to move on to the step-by-step guide for effectively removing silicone adhesive from your shower wall.
Step-by-Step Guide to Remove Silicone Adhesive
Removing silicone adhesive from a shower wall may seem daunting, but following these steps will make the process manageable.
Step 1: Prep the Area
Before you start, ensure the work area is clean and well-ventilated. Open windows or use fans to improve airflow. Protect surrounding surfaces with painter’s tape or drop cloths if necessary. This will prevent damage to areas you don’t want to affect during the removal process.
Step 2: Cut the Silicone
Begin by using a razor blade or scraper to cut along the edges of the silicone adhesive. Make shallow cuts to avoid damaging the wall or tiles. This step will help create an edge for pulling off the silicone.
Step 3: Use the Caulk Removal Tool
After cutting, take the caulk removal tool and slowly slide it under the silicone adhesive. Apply gentle pressure to lift the silicone from the wall. If the adhesive resists, do not force it; simply proceed to the next step.
Step 4: Apply Silicone Remover or Solvent
If the silicone is still firmly in place, apply a silicone remover or solvent along the edges and wait for it to penetrate. Most silicone removers require a few minutes to activate, so be patient. If you’re using a household solvent, soak a cloth in it and press it against the adhesive to help loosen it.
Step 5: Scrape Off the Adhesive
Once the product has had time to work, use your scraper or a plastic blade to lift the adhesive. Gently scrape away the silicone, working quickly and steadily. If you encounter resistance, repeat the application of the remover or solvent. Patience is key during this step.
Step 6: Clean the Area
Once the silicone adhesive has been removed, it’s time to clean the area. Use a bucket of warm, soapy water and clean cloths or paper towels to wipe down the surface. This step will remove any residual silicone or solvent.
Step 7: Inspect and Repeat if Necessary
After cleaning, inspect the area for any remaining adhesive. If there are stubborn spots, you may need to repeat the process until everything is removed. Checking for residue ensures a clean surface for any new adhesive or caulking.
Step 8: Dry the Area
Allow the shower wall to dry completely before applying new silicone adhesive or caulking. Moisture can weaken the bonding of new silicone, leading to potential issues down the line.
By following these steps, you will effectively learn how to remove silicone adhesive from shower wall and leave your surfaces ready for new sealing.
Safety Precautions and Considerations
Safety should always be your top priority when engaging in home improvement projects. Here are several precautions to keep in mind during the removal process:
1. Use Protective Gear
Always wear safety goggles to protect your eyes from fumes and accidental scratches. Gloves are also crucial to protect your skin from harsh chemicals found in silicone removers.
2. Ensure Good Ventilation
Work in a well-ventilated area to avoid inhaling toxic fumes. Open windows or use fans to promote airflow during the removal process.
3. Avoid Harmful Chemicals
When choosing a silicone remover or solvent, carefully read the label. Avoid products that contain harsh chemicals that could be harmful to your health or the environment. Opt for safer alternatives when available.
4. Handle Tools with Care
When using blades or scrapers, handle them carefully to avoid injury. Keep your hands steady and ensure that your fingers are away from the blade’s edge.
5. Dispose of Waste Properly
After completing the removal process, ensure that any waste materials or used cloths are disposed of properly, according to local regulations.
Following these precautions ensures not only your safety but the success of the removal project.
Maintenance Tips for Shower Walls
Once you have removed the silicone adhesive, it’s essential to keep your shower walls in good condition to prevent future build-up. Here are some practical maintenance tips:
1. Regular Cleaning
Adopt a routine cleaning schedule for your shower walls. Weekly cleanings will help prevent mold, mildew, and soap scum from accumulating. Use a gentle, non-abrasive cleaner designed for bathroom surfaces.
2. Invest in Quality Silicone
When reapplying silicone, choose a high-quality product that is specifically designed for bathrooms. Look for silicone that is mold-resistant and formulated for wet conditions. This will enhance adherence and longevity.
3. Dry Thoroughly
After using the shower, dry the walls with a squeegee or towel. Removing excess moisture minimizes mold growth and reduces the chances of adhesive failure in the future.
4. Check for Damage Regularly
Periodically inspect your shower for any signs of peeling or damaged silicone. Promptly address any issues as they arise to prevent further problems.
5. Reapply as Necessary
If you notice your silicone starts to wear or fail, don’t wait too long to reapply it. Doing so will avoid potential water damage and help maintain a clean appearance.
By implementing these maintenance tips, you can keep your shower walls in excellent condition and prolong the life of your silicone sealant.
Conclusion
Learning how to remove silicone adhesive from shower wall is an essential skill for homeowners and DIY enthusiasts alike. By understanding the nature of silicone adhesive and following the detailed step-by-step guide provided, you can tackle this task efficiently.
Always remember to prioritize safety by using protective gear and working in a well-ventilated area. Regular maintenance of your shower walls is just as critical to prevent future adhesive build-up. By caring for your space, you will ensure it remains aesthetically pleasing and functional.
If you follow these steps and tips, you will successfully remove silicone adhesive and keep your shower looking fresh and new. Don’t hesitate to share your experiences or tips in the comments section below! Happy DIY-ing!
